View app guide
Point of entry navigation
The Home page of the App has four icons at the bottom, which you can use to manage the system and all its functions.The colour yellow indicates the selected page.
Objects
Displays the functions configured in your system, among all the types of functions the App can manage (Video door entry system, Cameras, Burglar alarm system, Lights, Curtains and roller shutters, Climate control, Sensors, Accesses and presences, Music and audio, Energy, Sprinkler system, Programmes, Scenarios, Miscellaneous). There may be a badge beside each function; the yellow one shows the number of objects in an ON or open state, whereas the red one indicates the number of notifications associated to signals, updates, and maintenance performed on the system.Select the individual function to display all the objects (devices) in the system divided up according to the rooms.Select each object to activate/deactivate it or manage it according to its characteristics.

Rooms
Displays all the rooms making up your system. There may be a yellow badge beside each room displaying the number of objects in an ON or open state.The "system name" room is the environment in which the objects not assigned to specific rooms are placed.Select the room to display all its objects.Select each object to activate/deactivate it or manage it according to its characteristics.

Events
Displays all the messages relating to signals, updates, and maintenance performed on the system.They are divided up into General and Burglar alarm system (you will need to enter the PIN) and you can decide whether to display them all or only the most important ones, by selecting/deselecting the ones of interest to you.The presence of a red badge indicates notifications to read (missed calls, messages, etc.).

Settings
Grants you access to the general system and application settings; it displays the entire system structure on the whole (rooms, devices, functions, notifications, users, etc.).Select the relevant category to display every element and edit the current settings.

Icon types
The icons come in three different shapes depending on what they represent.
• Hexagonal: representing a category of function available in the system; select the icon to display all the objects in that category. You will only find inside Objects.

• Square: representing an environment in the system (for instance, the kitchen, a bedroom, etc.); select it to show all the objects it contains. You will only find it inside Rooms.

• Round: representing a device, a scenario or a programme; select it to determine an activation or deactivation control. Some of these may determine the opening of another screenshot to set the parameters the device. You’ll find it in Objects and Rooms.

How to operate the round icons
Depending on the type of object, you can differentiate the control according to how you touch the icon (rapid or prolonged tap).
• Lights or loads type objects
- Use a rapid tap to turn them on/off
- Use a prolonged tap to open the widget (where available) and set any adjustment parameters.
• Climate control type objects
Tap quickly to open the widget and drag the slider to change the setpoint temperature: if “automatic” mode is set, the new setpoint will work as a “manual timed” setpoint, with a settable time, after which it will go back to “automatic” mode.
Tap and hold down to add it to your Favourites or to access the settings to change the programming, the operating mode or the season.

• Dimmer and Audio type objects
- Use a rapid tap to turn on/off.
For instance, in the case of a dimmer, the light will be turned on/off with the brightness level previously set.
- Use a prolonged tap to open the widget and set the adjustment parameters.
For instance, in the case of a dimmer, you can set the colour, brightness, any colour loops, etc.

• Scenarios
- Use a rapid tap to activate the scenario.
- Use a prolonged tap to add it to your Favourites (or remove it).
CUSTOMISATIONS
Favourites
Displays the most frequently used elements set as your favourites and consequently immediately accessible from all screens. You can insert any type of object or room in your favourites (light, thermostat, scenario, whole rooms, etc.).
To insert an element among your Favourites, select it using a prolonged tap and press the "heart" icon or press the menu button (represented by an ellipsis) and select "Add to Favourites".
Caution: If an element inserted among your Favourites is marked with the symbol <?> this means it is not available, temporarily or permanently, in the system; you can wait for it to become available again or remove it.
Widgets and shortcuts
Widgets (for Android) and shortcuts (for iOS) are designed to control certain System favourites (devices or scenarios) without having to open the View App; specifically, you can:
- turn a light on/off;
- open/close an entrance in "Accesses and presences";
- activate/deactivate an actuation in "Various";
- activate an actuation from the video door entry system (for instance releasing a lock or switching on a light);
- call up a scenario;
- perform global controls for Lights and Roller shutters which are "All off" e "Raise/lower all", respectively.
Important:
- Widgets and shortcuts do not display device status but instead act by imposing the selected status on those devices.
- To use an object inside a widget or shortcut, it first needs to be inserted among your Favourites.
- Global controls are already available for use in widgets and shortcuts, so they do not need to be inserted in your Favourites.
To use widgets and shortcuts, no action is required through the View App; however, within the App, on the Favourites management page accessed from 'Settings,' all objects that can be used in widgets and shortcuts are marked by a black and white icon located to their right. Tapping this icon displays the message of availability for use.

Widget creation in Android
- Select the Widget menu on your mobile device, browse through the list and select the View App.
- Press "Add"; the page displayed shows you which objects can be managed.
- Choose the desired one and you will find it directly on your mobile device’s Home screen.
Shortcut creation in iOS
- Open the "Shortcuts" App on your mobile device (if this App is not present, you must install it).
- Select "+" followed by "Add action".
- Select "App" followed by the View App; the list of available shortcuts will be displayed.
- Choose the desired shortcut and confirm with "End".
- Perform a prolonged touch on the newly created widget and select “Share”.
- Select “Add to Home screen” and you will find it directly on your mobile device’s Home screen.
N.B.: you can also rename the control so that the Siri voice assistant can call it up easily.
Performing shortcuts with the Siri voice assistant
To perform a shortcut with Siri, simply say “Hey Siri” and the shortcut name (for example: “Hey Siri, turn on the living room light”).
The “shortcut performed” message will appear on the Home screen of your mobile device.
How to set the hourly programming of a climate zone
- Select "Settings" / "Climate control" / "Climate zone"
- Select "Programming - Summer" or "Programming - Winter"
- Set the time schedule
- If necessary, change the temperature by entering "Automatic mode - Summer" or "Automatic mode - Winter"

When operating in automatic mode, the system early switch-on function can be enabled; this mode activates the algorithm that detects the characteristics of the setting and sets the advance to obtain the desired temperature at the time set.
In automatic operating mode, when the early switch-on function is enabled, the timed manual mode is available with a fixed time which is defined by the advance algorithm.

How to create scenarios
A scenario is a 'snapshot' of the status of certain devices, chosen by the user, which is called up by an App or can be associated with physical controls (set up in advance by the installer) or triggered by routines (for By-me Plus and View Wireless), which can link them to specific time-based activation conditions.
The scenario therefore represents a particular status condition of one or more objects, even different from one another, present in the system and it is called up with a quick tap on the icon that represents it.
If you are an Administrator, you can create scenarios as follows:
- Select "Settings" / "Scenarios" / "Add"
- Name the scenario and fill in the required fields such as associated icon and its position in one or more rooms (generally the rooms contain the devices which you wish to create a status “snapshot” of).
- Select "Add" under "Activation conditions" and choose the way in which the scenario is to be activated from those available (via button, following an action or an event in the burglar alarm system/video door entry system, change in the quality of the air, etc.). The entry of activation conditions is not compulsory; if they are not entered, the scenario will only be called up from the App (or voice control).
- Select "Add" under "Objects to control"; among the categories of devices, choose those involved in the scenario and set them in the way you want them to be activated when the scenario is called up (for instance, light on, yellow light with 80% brightness and 60% colour intensity, roller shutter down, music on with volume at 60%, temperature at 22 °C, etc.).
- Confirm with "Done” and the scenario will be displayed in "Objects” / "Scenarios".
The scenario screen includes the list of "Activation conditions" and of "Activation objects" with all the devices involved; you can edit it at any time, adding/removing conditions and devices, resetting parameters, etc.
You can delete the entire scenario using the "Delete scenario” option at the end of the screen.
The View App features a wizard that guides you step-by-step through the creation of a scenario following the procedure just described.
Important: In order to activate a scenario from a button, the Installer must have previously made arrangements, during the system configuration phase, for buttons dedicated to the activation of the scenarios.
Routines can also be used to schedule the activation of a scenario at specific times; for instance, to turn on outdoor garden lights, the “sunset” condition of routines can be used to call up the “Garden Lights ON” scenario, while the “dawn” condition can be used to call up the “Garden Lights OFF” scenario.
N.B.: Scenarios can also be created both locally and remotely also by the Installer and by Basic users provided the Administrator has given them privileges to perform this operation.

Routines
A routine is a list of actions which are carried out, within a View Wireless* system, dependent upon a specific event referred to as a trigger.
Triggers consist of a time and a type of frequency:
- the time can be a fixed time (for instance 7:30) or a variable time relating to dawn or sunset (for instance 10 mins before sunset or 5 mins before dawn);
- the type of frequency can be weekly / monthly / annually or during holidays inserted in a specific customisable list.
The actions which can be carried out are:
- turning a simple light or dimmer on/off;
- changing the brightness of a dimmer;
- handling a roller shutter or curtain;
- opening/closing an entrance in Accesses and Presences;
- activating/deactivating an actuation in Various;
- thermostat season change;
- launching a scenario.
In every single routine, several actions can be carried out (up to a maximum of 30), possibly with a pause in between (i.e. a wait, specified in minutes).
In a system, the Administrator can create a maximum of 20 routines.
To create routines, select "Settings" / "Routines" and press the + push button.
For certain types of trigger, the system properties need to be set in "Settings” / "System management”; select the name of the system and set:
- holiday calendar;
- system location.
After the routines have been created, in the Objects view you will see the list of routines created and can pause them or restart them but not edit them (changes are only permitted from "Settings" / "Routines").
*Important: To use the routines, the View Wireless system gateway must be updated to version fw r483 or later.


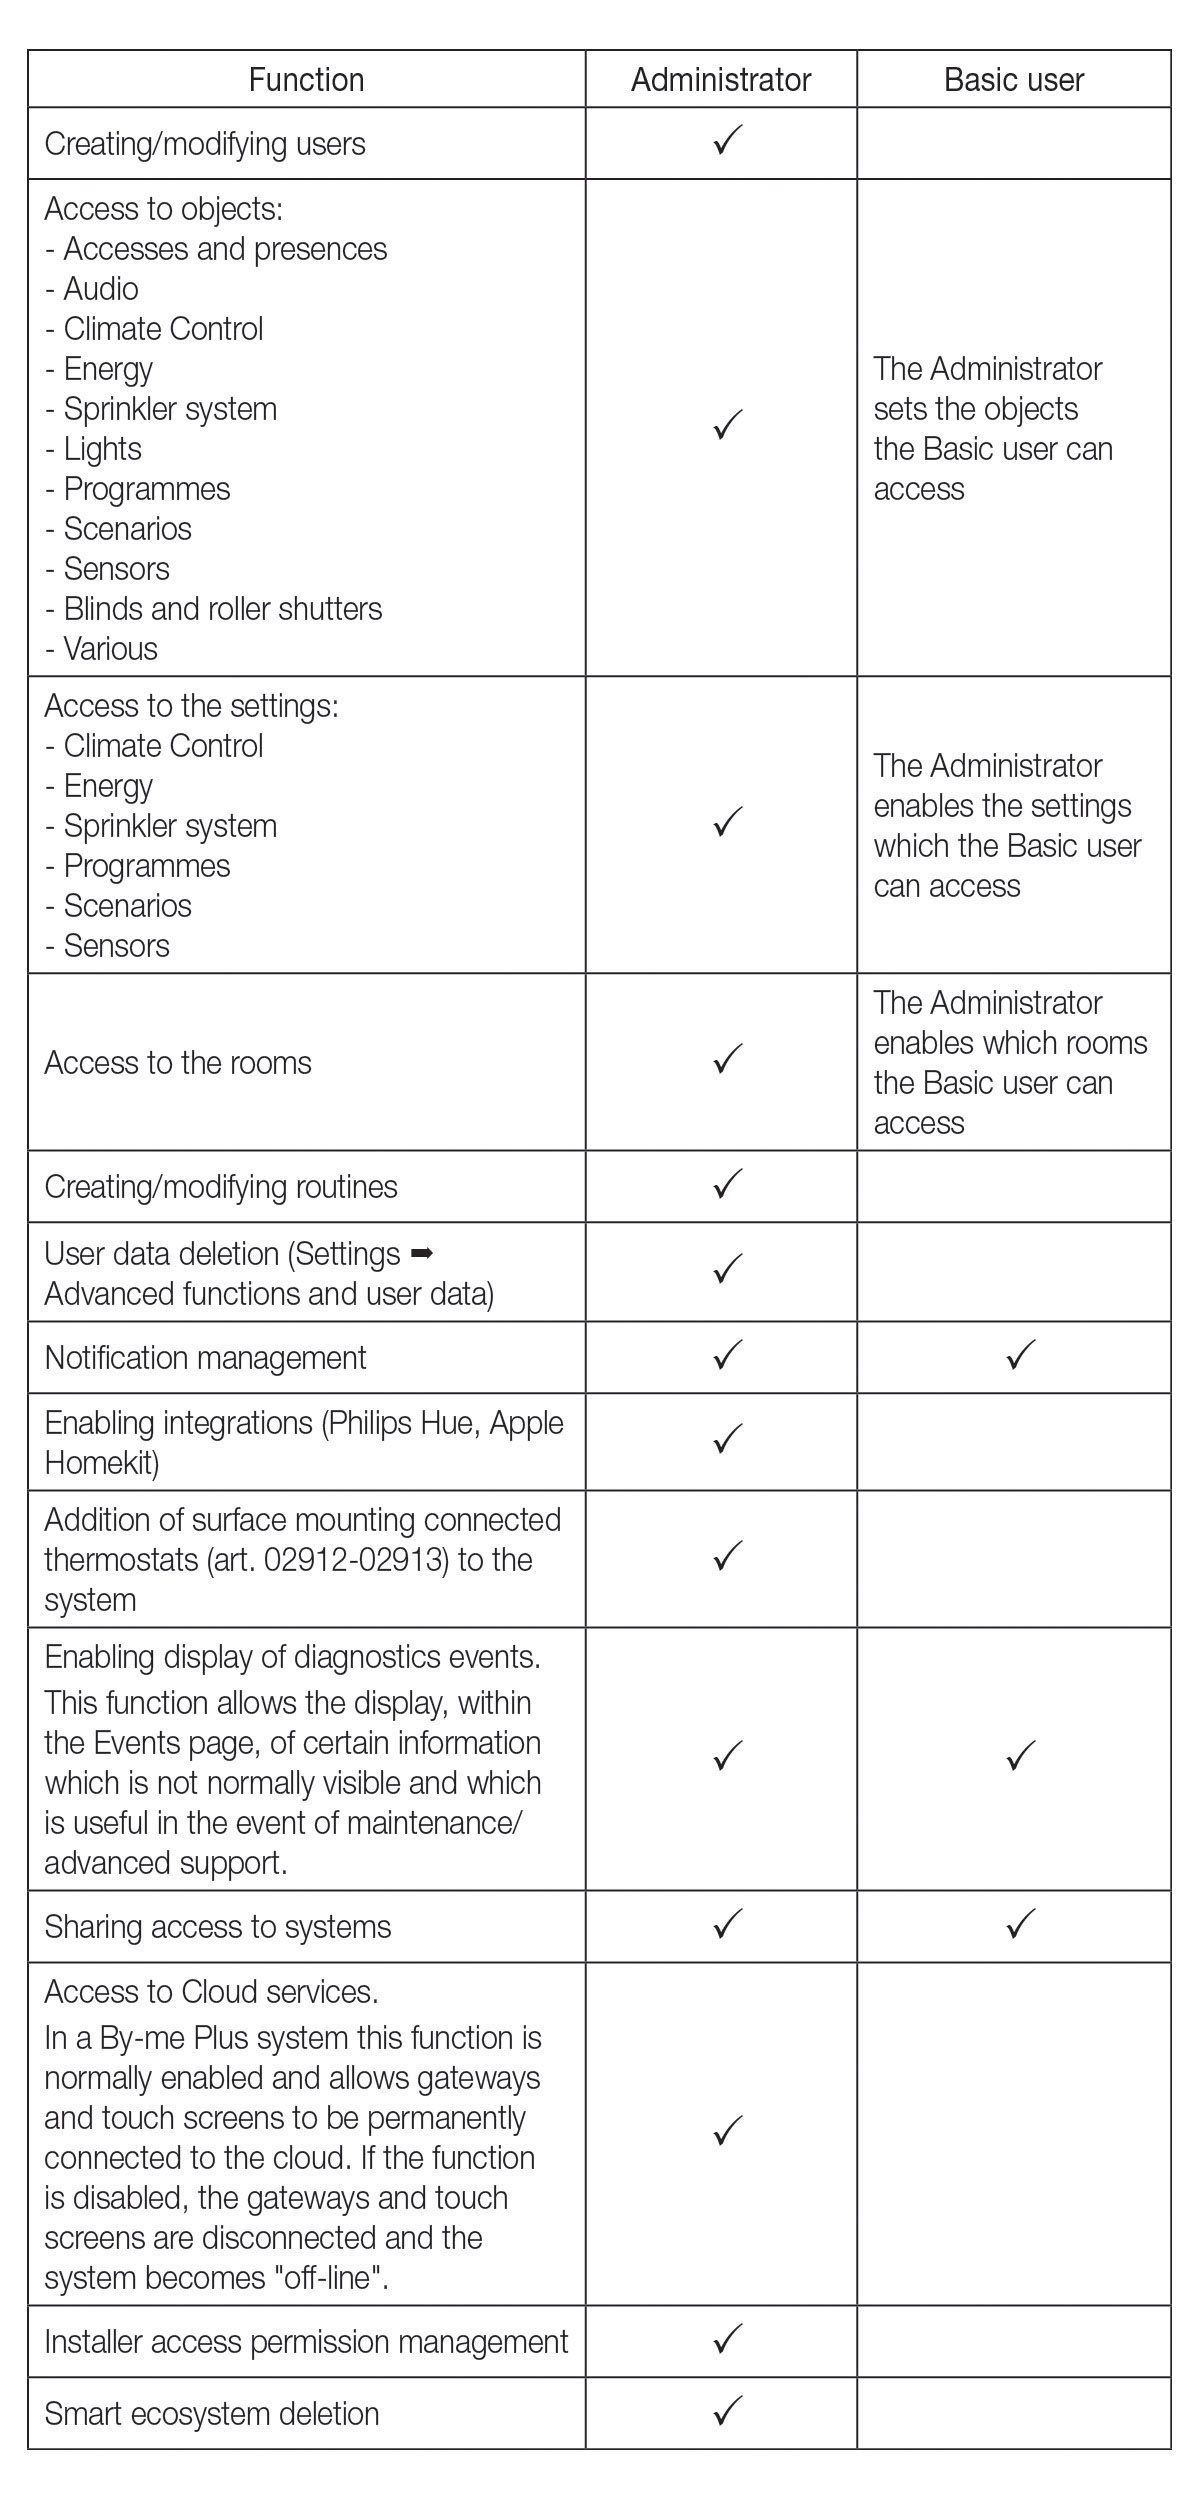
User management
The Administrator is the user who received “delivery” from the Installer or who configured the IoT devices in their own system.
The Administrator has full control of the system functions, associates the Basic users who operate on the system and assigns functions and environments with which they can interact.
Every Basic user needs to have downloaded the View App onto their mobile device and created their own profile on MyVIMAR.
How to associate a Basic user
N.B. In a By-me Plus system, the Administrator and the new user must be connected to the same Wi-Fi network as that system.
1. The Administrator selects "Settings" / "Users and permissions" (the list of any users present is displayed) / "Add".
The system is now waiting for the Basic user to associate with the system by logging into the App with their MyVIMAR profile; this should be done within 60 seconds otherwise the entire process will need to be repeated.
2. After the Basic user has accessed the App with their profile, the screen displayed prompts association with the system; once this process is complete, the Administrator will view confirmation that this association was successful. The new user will now be visible in the list.
The procedure should be repeated for all the basic users to be paired.
How to manage users
The Administrator has the right to assign, for every user, the environments which can be displayed (and consequently the functions that can be used); this makes it possible to reserve certain controls concerning different users using the same system.
For instance, every member of the family can control only their own room and all communal areas whereas a porter can control only those areas reserved for them (utility room, garage, etc.).
- Select "Settings" / "Users and permissions” to display the list of users and devices divided up into Vimar ones and third-party ones integrated into the system.
- Select the user; you will have three types of options to decide with which functions (Accesses, Audio, Climate control, etc.), rooms and settings (temperature control, audio volume, brightness) the users can interact or not.
- Select "Access to objects" and use the cursor to enable the functions the user can use.
- Select "Access to rooms" and use the cursor to enable the rooms the user can access.
- Select "Access to settings" and use the cursor to enable those the user can edit as they please.
N.B. Access to the settings depends on the objects which have been enabled; if access is disabled, the respective settings item is displayed as not accessible and cannot be edited. - Confirm with "Done".
Use "Copy permissions configuration" to access a self-guided menu that allows you to copy the permissions from one user to another.
CAUTION:
- The Administrator can remove all associated users from the system.
- The Administrator can remove themselves from the system; in this case, to associate a new Administrator, the Installer will have to repeat the “delivery” of the system again. The new Administrator will then have to create the basic users again.
- Basic users can remove themselves from the system.
How to activate notifications
- Select "Settings" / "Notifications” to display the list of events, divided up according to type, which can generate push notifications.
- Use the cursor to enable the notifications to receive.
- Confirm with "Done".
The table below lists the features that can be performed by the Administrator and the Basic User.
How to activate remote access to the system for another user
The Administrator may temporarily grant remote access to their systems to another user registered in MyVimar who temporarily inherits the rights thereto. This function allows the third-party subject to operate remotely, for instance to perform climate control parameter settings or modify scenarios/routines.
Important:
• No more than 3 simultaneous accesses can be granted; access will be granted for a duration of 24 hours, which can be extended or revoked by the person granting access.
• Both the Administrator and the user receiving access rights are notified of this access permission.
• Users must be registered in MyVimar (the App checks whether the user really exists).
- Select "Settings" / "Profile options"/ "Share access to your systems"/ "Create new invitation"; a “Warning” message will be displayed, showing the characteristics of the function you are about to grant.
- Select "Continue" and enter the e-mail address of the user to grant access to.
- The permission is then active and you will receive a notification e-mail the moment the user logs into the system.
The user receiving permission will see the new system in the list of those available in their “System management” menu.
IOT device configuration
The App allows you to configure and manage the 2-button voice control and actuator 30815 and Wi-Fi and LTE surface mounting thermostats 02912-02913.
2-button voice control and relay actuator with built-in Alexa
The device is capable of receiving vocal controls from the user and of carrying out the actions associated with them; you will be able to configure it in various ways:
• Stand alone
The device works independently and the management of the load connected to it is through push buttons and vocal controls.
• Integrated within the View Wireless and By-me Plus systems
The device works in an integrated way with all the devices in the system, the push buttons and vocal controls can therefore control different loads, and similarly the management of the connected load can be performed from other control devices.
Wi-Fi and LTE surface mounting thermostats
Fitted with a user-friendly and minimal user interface, featuring a modern design (visible animated LED matrix display with side status display), the thermostats allow multi-zone or multi-home management and are compatible with Alexa, Google voice assistants and with the IFTTT protocol.
CONFIGURATION
1. Select "Settings" / "Smart Devices" / "Add" .
2. Select "Vocal control" or "Wi-Fi thermostat" or "LTE thermostat" and follow the self-guided menu to complete the configuration process.
Integration with Elvox CCTV
IP CAMERAS
The Administrator can integrate into the View App the display of digital cameras and/or the NVR/XVR streams.
New IP and Wi-Fi cameras can be added in standalone mode or via NVR or XVR, details and automatic display sequence times can be set, some can be deleted or the associated options edited.
For optimum performance, we recommend the following video stream settings:
• codec H264 profile main
• 720p resolution (1280x720)
• 25 fps
Analogue cameras in standalone mode are on the other hand acquired by the video door entry system and can only be renamed, repositioned or deleted.

1. Select "Settings" / "Cameras" (to display the list of any cameras present) / "Add camera"
2. Select one of the data entry types for your system from the list:
- Elvox CCTV camera (for cameras installed in standalone mode);
- Elvox CCTV NVR/XVR (for cameras installed with recorder);
- Elvox Wi-Fi CCTV camera (for cameras installed in standalone mode);
- Generic camera model.
3. Follow the compilation format and enter the missing data; you can also edit the pre-compiled data simply by tapping the field you want to edit. Start with the name of the camera, proceed with the protocol and then follow the entire list in sequence.
Below is an example of the string used to call up the streaming from the IP cameras, the NVR/DVR and Wi-Fi cameras. The addresses that will be returned by filling in the format will be as follows:
- Elvox IP CCTV camera with password: rtsp://user:password@192.168.1.200:554/profile2
- - In the “Username and Password” field, enter the user and password for your camera
- - In the “Profile” field, the pre-compiled data in “profile2” corresponds to the secondary low-resolution streaming; for the main high-resolution streaming enter “profile1”.
- Elvox IP CCTV camera without password: rtsp://192.168.1.200:554/profile2
- Leave the “Username and Password” fields empty
- NVR/XVR Elvox CCTV: rtsp://user:password@192.168.1.200:554/chID=1&streamType=St&linkType=tcp
- - In the “Username and Password” field, enter the user and password for your recorder
- - In the “Profile” field, the pre-compiled data will be displayed as follows: “chID=1&streamType=sub&linkType=tcp”; edit the channel number depending on the camera you want to display. For instance, for channel two, change “chID=1” to “chID=2", for channel 8 to “chID=8", etc.; instead of “sub”, which refers to the secondary low-resolution streaming, insert “main” for the main high-resolution streaming.
- Elvox Wi-Fi CCTV camera: rtsp://admin:password@192.168.1.200:8554/Streaming/Channels/102
- - In the “Username and Password” field, enter the user and password for your camera
- - In the “Profile” field, the pre-compiled data in “Streaming/Channels/102” corresponds to the secondary low-resolution streaming; for the main high-resolution streaming enter “Streaming/Channels/101”.
The camera must have a fixed IP address (static and reserved by the DHCP server) so that the IP address uniquely identifies the camera in the IP network.
IMPORTANT: all data and changes must be typed without any spaces or tabs between characters.
4. Place the camera in one of the environments in the list and confirm with "Done".
You can delete a camera with the "Delete camera" option at the end of the screen.
How to set the automatic sequence
You can set the order in which the cameras are displayed and how long the image is displayed.
- Select "Settings" / "Cameras” / "Automatic sequence".
- Select the cameras to be included in the sequence and set the display time for each one.
- Sort the cameras; hold down the row with the name of the camera and shift it up or down in the list.
Integration with third party systems
The App is designed to integrate devices made by other manufacturers into the system and manage them in the same way all Vimar products are managed; specifically, IP cameras, Philips Hue lamps and interfacing with the Apple Casa (Home) App.
PHILIPS HUE LAMPS (integration available only for By-me Plus systems with gateway 01410 or 01411)
To manage Philips Hue lamps, it is necessary for the Administrator to associate the Hue Bridge (interface that allows the integrated management of the lamps) and the lamps associated with it, by placing them in the desired environments and assigning them a name.
- Select "Settings" / "Integrations" / "Philips Hue" / "Add"; the system searches for the Hue Bridges present (once they are found, their serial number is displayed).
- Choose the Hue Bridge and press the association button.
- Once the association process is complete, confirm with "Done".
Once a bridge is associated, all the lamps controlled by it are acquired, they can therefore be controlled and displayed in “Hue Lamps”. - Assign a name to each lamp, position it in the desired environment and choose an icon to represent it; the lamp is therefore associated with the system.
When associating a new lamp, you can choose:
- whether to associate it individually (independent);
- whether to add it to another lamp that is already configured and thus create a group;
- whether to add it to an existing group.
5. Confirm with "Done".
N.B. Use Hue Bridges ver. 2.0 and later.
APPLE CASA (HOME) APP
Using an iOS mobile device ver. 11.3 or later, the Administrator can manage certain functions of the home automation system via the Casa (Home) App.
In the event of systems that have already been installed, you need to make sure your installer has updated the firmware:
- to version 1.7.1 or later for the home automation system gateway 01410-01411;
- to version r452 or later for the IoT gateway 30807-20597-19597-16497-14597-09597.
Requisites for the correct operation of the Casa (Home) App
• The mobile device on which the View App and the Casa (Home) App are installed must be connected to the same network as the home automation system gateway (01410-01411) or as the IoT gateway (30807-20597-19597-16497-14597-09597).
N.B.:
- Briefly press the F2 key to activate/reactivate the home automation system gateway 01410-01411 association phase manually (this takes approximately 10 minutes).
- Briefly press the front push button to activate/reactivate the IoT gateway 30807-20597-19597-16497-14597-09597 association phase (which takes approximately 10 minutes); the LED lights up yellow for 2 s to confirm activation.
• According to Apple standards, in order to use the Casa (Home) App remotely, it is necessary for the respective hub to be present in the system (for instance, Apple TV or HomePod).
The Casa (Home) App, which must first be installed on the same mobile device as the View App, allows you to manage functions with Siri too.
The table indicates the functions supported and the correspondence with the applications configured by your installer which you will see in the View App:
* The “Roller shutter without position” configuration is not supported on the Casa (Home) App.

- Select "Settings" / "Integrations" / "Apple Homekit"
- Select "Proceed"; the gateway interfacing operation will begin (indicated with "Bridge accessory") that will then allow you to view the functions on the Casa (Home) App.
- Once connected, define the name and position of the bridge accessory in the environment, by selecting it among those suggested. N.B. The name of the environments (and the list of applications inside them) is not shared between the View App and the Casa (Home) App, so you need to define where to insert the applications inside the environments created in the Casa (Home) App.
- Perform the operation up to point 3 also for all the functions to be managed; the App will propose them one by one, then assign the environments to each one. Once the functions belonging to the same application have been assigned, their total number is displayed.
- You will then automatically exit the association screen; open the Casa (Home) App. The scenarios created with the View App are not imported; you will have to create them again with the Casa (Home) App using “Add scene".
Voice controls
If connected products belonging to the View ecosystem have been installed in your system, you can enable voice control to manage the available functions.
Specifically:
• With the View skill/action for Amazon Alexa, Google Home or with Apple Homekit, you’ll be able to control lights (ON/OFF and monochrome/RGBW dimming), handle curtains and roller shutters, control the temperature and call up scenarios. To do this, the home automation system gateway (art. 01410-0411) or the IoT connected gateway (art. 30807-20597-19597-16497-14597-09597) need to be present in the system.
• With the View Product skill/action for Amazon Alexa or Google, you’ll be able to control connected multiple socket outlets (art. 00447.CC.B), connected adaptors (art. 00335.B) and Elvox wi-fi cameras (art. 46238.027A-46239.040A-46237.040A).
N.B. Roller shutters with slats are not managed by voice controls.
IMPORTANT: The syntax of the controls is managed exclusively by Amazon, Google and Apple; Vimar is in no way responsible for any changes (we recommend you always check the Alexa, Google and Siri documentation).
Amazon Alexa
Requirements for correct operation
- Administrator account created on MyVimar
- Amazon account
- Amazon voice device or the Alexa App
- Activate the Vimar View or Vimar View Product skill in the Amazon Alexa App depending on the device to control
Main functions and respective voice controls to control Vimar systems
• All voice controls must be preceded by the word "Alexa"
• The names of the devices or environments:
- must be in the same language as the voice assistant to be understood easily
- must not contain the name of colours
View Skill
• Turning lights on and off
Turn on [Name of Light]
Turn off [Name of Light]
• Dimming lights (including Philips Hue lamps)
Turn on [Name of Light]
Turn off [Name of Light]
Increase [Name of Light] - the brightness increases in 25% steps
Decrease [Nome Luce] - the brightness decreases in 25% steps
Set the [Name of Light] to [X]%
Set the [Name of Light] to [Name of Colour] - only for coloured lamps
• Curtain and roller shutter handling
Increase [Name of Roller shutter]
Decrease [Name of Roller shutter]
Set the [Name of Roller shutter] to [X]% - only for roller shutters and curtains which support the position function
• Heating and Air conditioning temperature control
Set the [Name of Thermostat] to Off - thermostat "Off" and Amazon Alexa "Off"
Set the [Name of Thermostat] to [X] - thermostat set to "Manual" and Amazon Alexa status "Hot" (Heating) or "Cold" (Air conditioning)
Set the [Name of Thermostat] to Automatic - thermostat and Amazon Alexa status "Automatic"
Set the [Name of Thermostat] to Economy mode - thermostat set to “Absence” and Amazon Alexa status "Eco"
Set the [Name of Thermostat] to [X] for [Y] hours - thermostat set to "Timed manual" and Amazon Alexa status "Hot" (Heating) or "Cold" (Air conditioning)
• Neutral Zone temperature control
Set the [Name of Thermostat] to Off - thermostat "Off" and Amazon Alexa "Off"
Set the [Name of Thermostat] to [X] - thermostat set to "Manual” and Amazon Alexa status "Automatic"
Set the [Name of Thermostat] to Automatic - thermostat set to "Manual” and Amazon Alexa status "Automatic"
Set the [Name of Thermostat] to Economy mode - thermostat set to "Manual” and Amazon Alexa status "Automatic"
• Sensor status - Contact
Is the [Name of Sensor] open?
Is the [Name of Sensor] closed?
• Sensor status - Temperature
What is the temperature of [Name of Sensor]?
• Various - Power on and off
Turn on [Name of Various]
Turn off [Name of Various]
• Scenarios
Turn on [Name of Scenario]
• Contact status - Accesses
Is the [Name of Contact] open?
Is the [Name of Contact] closed?
View Product Skill
• Turning socket outlets on and off (only for connected adaptor, single output of the connected multiple socket outlet or the whole multiple socket outlet)
Turn on [Name of Socket outlet]
Turn off [Name of Socket outlet]
• Viewing from camera
Show [Name of Camera] - view the live images from the camera on the Amazon Alexa device with a monitor
Stop - stop viewing
N.B. With the Amazon Alexa App, you can create routines which, by pronouncing specific sentences, can also activate a chain of multiple actions.
Requirements for correct operation
- Administrator account created on MyVimar
- Google account
- Google voice device or Google Home App
- Activate the Vimar View or Vimar View Product action in the Google Home App
Main functions and respective voice controls to control Vimar systems
- All voice controls must be preceded by the sentence "Ok Google"
- The names of the devices or environments:
- must be in the same language as the voice assistant to be understood easily
- must not contain the name of colours
View Action
• Light status/on/off
Turn on [Name of Light]
Turn off [Name of Light]
Is the [Name of Light] on?
• Dimming lights (including Philips Hue lamps)
Turn on [Name of Light]
Turn off [Name of Light]
Is the [Name of Light] on?
What is the brightness of [Name of Light]?
Brighten the [Name of Light] - the brightness increases in 15% steps
Dim the [Name of Light] - the brightness decreases in 15% steps
Set [Name of Light] to [X]%
Set [Name of Light] on [Name of Colour] - only for coloured lamps
• Curtain and roller shutter status and handling
Open [Name of Roller shutter]
Close [Name of Roller shutter]
Is the [Name of Roller shutter] open?
Set [Name of Roller shutter] to [X]% - only for roller shutters and curtains which support the position function
• Heating and Air conditioning temperature control
Set [Name of Thermostat] to Off - thermostat "Off" and Google status "Off"
Set [Name of Thermostat] to [X] degrees - thermostat set to "Manual" and Google status "Hot" (Heating) or "Cold" (Air conditioning)
Set [Name of Thermostat] to Automatic - thermostat set to “Automatic” and Google status "Other"
Set [Name of Thermostat] to Economy mode - thermostat set to “Absence” and Google status "Eco"
• Neutral Zone temperature control
Set [Name of Thermostat] to Off - thermostat "Off" and Google status "Off"
Set [Name of Thermostat] to [X] degrees - thermostat set to “Manual” and Google status "Other"
Set [Name of Thermostat] to Automatic - thermostat set to “Manual” and Google status "Other"
Set [Name of Thermostat] to Economy mode - thermostat set to “Manual” and Google status "Other"
• Sensor status - Contact
Is the [Name of Sensor] open?
Is the [Name of Sensor] closed?
• Sensor status - Temperature
What is the temperature for [Name of Sensor]?
• Various - Power on and off
Turn on [Name of Various]
Turn off [Name of Various]
Is the [Name of Various] on?
• Scenarios
Turn on [Name of Scenario]
• Contact status - Accesses
Is the [Name of Contact] open?
Is the [Name of Contact] closed?
View Product Action
• Turning socket outlets on and off (only for connected adaptor, single output of the connected multiple socket outlet or the whole multiple socket outlet)
Turn on [Name of Socket outlet]
Turn off [Name of Socket outlet]
• Viewing from camera
Show [Name of Camera] - view the live images from the camera on the Google device with a monitor
Stop [Name of Device with monitor] - stop viewing
N.B. With the Google Home App, you can create routines which, by pronouncing specific sentences, can also activate a chain of multiple actions.
SIRI
Requirements for correct operation
- Administrator account created on MyVimar
- Apple ID
- iOS device on which the View App and the App Casa are installed
- Siri voice device
Main functions and respective voice controls to control Vimar systems
- All voice controls must be preceded by the word "Ehi Siri"
- The names of the devices or environments:
- must be in the same language as the voice assistant to be understood easily
- must not contain the name of colours
• Light status/on/off
Turn on [Name of Light]
Turn off [Name of Light]
Is the [Name of Light] on?
• Dimming lights (including Philips Hue lamps)
Turn on [Name of Light]
Turn off [Name of Light]
Is the [Name of Light] on?
Brighten the [Name of Light] - the brightness increases in 15% steps
Dim the [Name of Light] - the brightness decreases in 15% steps
Set the [Name of Light] to [X]%
Set the [Name of Light] on [Name of Colour] - only for coloured lamps
• Curtain and roller shutter status and handling
Open [Name of Roller shutter]
Close [Name of Roller shutter]
Is the [Name of Roller shutter] open?
Set the [Name of Roller shutter] to [X]% - only for roller shutters and curtains which support the position function
• Heating and Air conditioning temperature control
Set the [Name of Thermostat] to Off - thermostat "Off" and Home App status "Off/Not active"
Set the [Name of Thermostat] to [X] degrees - thermostat set to "Manual" and Home App status "Hot" (Heating) or "Cold" (Air conditioning)
• Neutral Zone temperature control
Set the [Name of Thermostat] to Off - thermostat "Off" and Home App "Off"
Set the [Name of Thermostat] to [X] degrees - thermostat set to “Manual” and Home App "Other"
• Sensor status - Contact
Is the [Name of Sensor] open?
Is the [Name of Sensor] closed?
• Sensor status - Temperature
What is the temperature for [Name of Sensor]?
• Various - On, Off and Status
Turn on [Name of Various]
Turn off [Name of Various]
Is the [Name of Various] on?
• Scenarios
Activate the [Name of Scenario]
• Contact status - Accesses
Is the [Name of Contact] open?
Is the [Name of Contact] closed?
N.B. With the Siri App, you can create automations which, by pronouncing specific sentences, can also activate a chain of multiple actions.
Update release notes
This section contains the main new features introduced by the updated App version releases.
View for iOS and Android mobile phones – ver. 2.12.0 - 15 March 2025
- Introduced the possibility of temporarily granting access to one’s systems for remote support on App by third parties.
The Administrator user may temporarily grant remote access to their systems via the View App to another user registered in MyVimar who temporarily inherits the rights thereto. This function allows the third-party subject to operate remotely, for instance to perform climate control parameter settings or modify scenarios/routines.
- For Android only - Introduced the possibility of using widgets of the operating system to manage simple actuations without opening the App
By inserting the actuations in the system favourites, they can be managed within a widget of the operating system.
- For iOS only - Introduced the possibility of using iOS shortcuts to manage simple actuations without opening the App.
By inserting the actuations in the system favourites, they can be managed within an iOS shortcut.
- Introduced support for the supervision of the new smart articles in the View Wireless system.
For View Wireless smart systems, the possibility of supervising the new articles available has been added: IoT multi-function actuator for lights/roller shutters/loads, IoT 0-10V actuator with relay for dimming, IoT module with 3 inputs and 1 output for voltage-free contacts used for notifications, sensor interfacing, electric lock opening.
View for iOS and Android mobile phones – ver. 2.11.0 - Jan 15, 2025
1. Extension of the option to create routines for By-me Plus systems and introduction of the option to create routines involving Wi-Fi and LTE connected thermostats:
- from "Settings" / "Routines" you can create simple automations by selecting the activation conditions based on timers (specific dates, astronomical clock, etc.) and the action to be carried out (status change of selected devices, calling up a scenario, etc.);
- you can create a chain of related actions, possibly introducing delays in the performance between one and the other.
2. Introduction of certain graphic and functional enhancements.
View for iOS and Android mobile phones – ver. 2.10.0 - Oct 15, 2024
1. Introduced the possibility of creating routines on View Wireless smart systems:- from "Settings" / "Routines" you can create simple automations by selecting the activation conditions based on timers (specific dates, astronomical clock, etc.) and the action to be carried out (status change of selected devices, calling up a scenario, etc.);- you can create a chain of related actions, possibly introducing delays in the performance between one and the other.
2. Introduced a warning pop-up during Cloud maintenanceDuring Cloud maintenance, when the View App is opened connected to the Internet, an information pop-up is shown about the activity under way. Supervision from the View App is temporarily limited only for those systems requiring Cloud connectivity whereas there is no limitation to supervision operations for systems that do not require connectivity (for instance, the use of the View App on By-me Plus system locally).
3. Enhancements to the climate control widgetExtended the maximum duration of the “Timed manual" mode of thermostats.
4. Inserted "FAQs" and “Vocal Controls” sections to the View App on-line help:- inserted the main vocal controls which can be used with Amazon Alexa/Google Home/Siri to control the system functions;- inserted the FAQs section which prompts answers to some of the most frequently asked questions.
View for iOS and Android mobile phones – ver. 2.9.0 - Jul 15, 2024
1. Optimised the use of widgets for Climate control management:- introduced a new key to go back to “Automatic” from "Timed manual”.- increased the size of the font indicating the temperature inside the Climate control icon;- introduced direct access to Climate control programming from the widget icon;- improved the Climate control programming management, especially the time slots near temperatures T1, T2 and T3.2. Graphic and functional enhancements:- in "Settings” / "Burglar alarm system", introduced a button for the active user to log out and allow the insertion of a PIN for another user to log in;- introduced the possibility on the part of the user to configure the display of certain events relating to the system.
View for iOS and Android mobile phones – ver. 2.8.0 - Mar 13, 2024
1. Optimised the display of the video door entry contacts list for systems with single entrance panel and single indoor station:- if limited to 2, the indoor and outdoor stations available are displayed directly in the video door entry system widget; select the outdoor station to activate self-start directly.- if more than 2, the indoor and outdoor stations are placed inside “Call devices”.
2. Simplified configuration of ELVOX IP CCTV cameras.From "Settings" / "Cameras”, you’ll access a wizard with which you can add IP cameras and pre-compile the strings granting access to the video streams.
For full details, see "Integration with Elvox CCTV"
3. Introduced the management of the View App version changelog.After each App update, a pop-up is displayed on first start-up listing the news introduced and a link to the details section which can also be accessed from "Settings" / "Help" and "Feedback".
View for iOS and Android mobile phones – ver. 2.7.0 - Jan 15, 2024
Introduced the possibility of customising the icons on the controls of Linea’s XT platform.
1. You can access the customisation functions:- from "Settings" / "Rooms and devices" (by selecting the specific control associated with the related environment);- directly from the context menu of the objects.
2. After selecting the specific control, you’ll be able to customise the fixed matrix in two ways:- by choosing from a list of default icons in the library;- by designing it freely using all the pixels in the matrix.
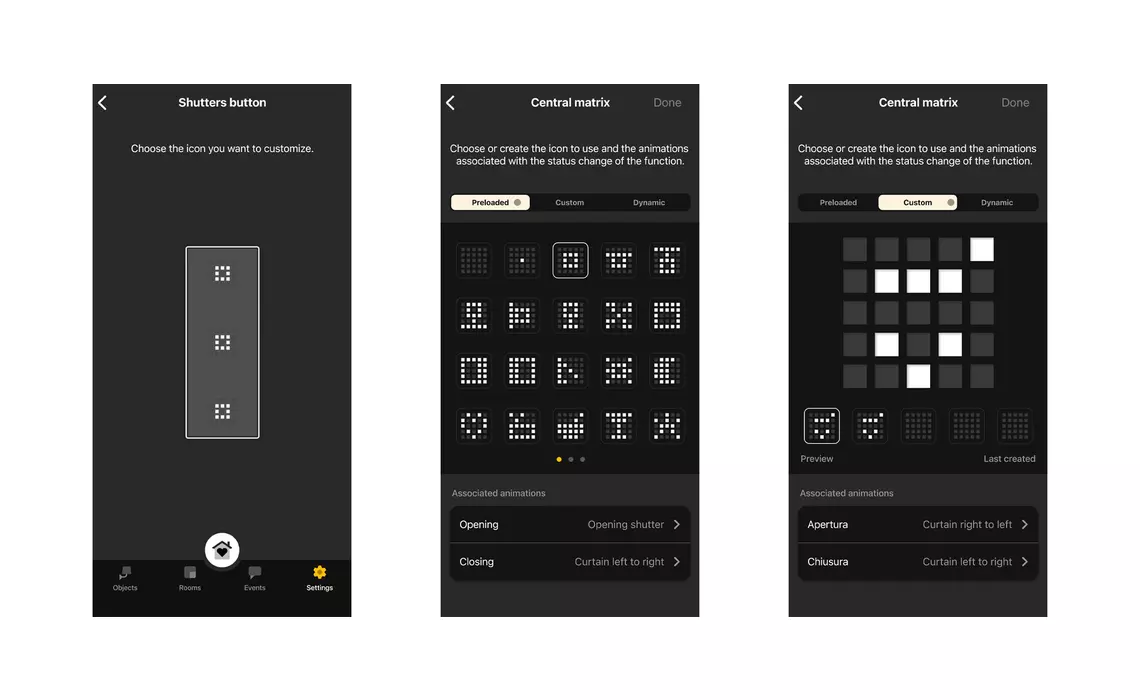
You can also define the dynamic (animated) icon by selecting it from a list of default icons.
Icon customisations can then be propagated to similar controls.
View for iOS and Android mobile phones – ver. 2.6.0 - Nov 15, 2023
Introduced the push button to contact technical support.Accessible from "Settings" / "Help and feedback", it allows you to contact Vimar should you need support using the App. For suggestions, the namesake section on the same page remains active.
View for iOS and Android mobile phones – ver. 2.5.0 - Oct 10, 2023
Introduced the management of the XT multisensor for the By-me Plus home automation system (art. 32042.B/C/G)The device is fitted with four integrated sensors and a LED matrix, to measure and display environmental parameters such as the proximity sensor (to wake up the user interface), room temperature (thermostat function), relative humidity (humidistat function) and air quality via VOCs (Volatile Organic Compounds).You can use the sensor values to manage automations aimed at improving comfort and air quality in your environment.
In addition to managing environmental parameters, the multisensor can be programmed for other functions, such as viewing alarms or controlling lights, roller shutters, audio and scenarios, with a wide variety of central icon customisations using symbols or letters/numbers on the generously-sized LED matrix.

For further information, see: By-me Plus Multisensor for Linea’s XT platform (vimar.com)
FAQ
How do you access the Burglar alarm system?
1. From the "Objects" screen, select “Burglar alarm system”
2. Enter your PIN; you’ll see the status of the system and all the functions you can use (activation/deactivation of areas, status of sensors, etc.) depending on your user profile and the permissions you have been assigned.
For instance, if you can operate on all areas, you’ll be able to operate the activations/deactivations of each one; if on the other hand you can only see one or more areas without being able to control them, you’ll see a warning pop-up.
Any partitioning configured by the installer is displayed for each individual area (PARTIAL A, PARTIAL B, PARTIAL C and PARTIAL D) which affect the groups of sensors associated with each one.
By enabling "Immediate activation", the activation selected (TOTAL or one of the four partials) will be actuated, resetting any entry/exit times (where envisaged); this function is useful, for instance, when you want to actuate a partitioning which allows you o stay at home without having to wait for the entry time with the related buzzer on the keypad.
By selecting "Settings" / "Intrusion" and entering your PIN, you can view the list of all zones divided by area and their current status.


How do you enable notifications on the View App?
If you have a connected system, you can enable the receipt of push notifications concerning situations/events relating to the status of the system.
1. Select "Settings”/"Notifications".
2. Use the cursor to enable the notifications you wish to receive in the presence of the associated event/operation.
3. Confirm with "Save"
N.B. You can separately enable notifications belonging to different categories, such as system, automation system, video door entry system, burglar alarm system, Wi-Fi connected thermostats, Amazon Alexa voice controls.
What are SIP users in the video door entry system?
The View App allows you to receive video door entry calls directly from the entrance panel or from other indoor stations (intercom function); to do this, the user utilising the App must be enabled as a “SIP user". For every system, up to 10 SIP users can be configured, of which only 3 can have a video preview during a call from the entrance panel (before answering). All 10 users can answer the call, viewing the video and interacting via audio.
SIP users can interact remotely with the video door entry system and are therefore capable of managing it in the same way as they would form the home video entryphone (viewing and answering calls, door release, etc.). If you are the Administrator you can manage SIP users interacting with the system.
1. Select "Settings”/"Video door entry system".
2. Select "Manage SIP authorisations" to view the list of devices enabled and access the video door entry system functions and if necessary delete them.
3. Select "SIP authorisations" and enter the data of the device to enable.
4. Confirm with "Save"
Example of enabling 4 SIP users, three of whom can view the preview (identified by the "Video entryphone” icon):

How do you use one or more sprinkler system applications?
SPRINKLER SYSTEM type applications must be configured in the system in advance by your Installer.
Every application allows you to associate between 1 and 16 zones which are activated sequentially via the hourly scheduling available in the View App and which the Administrator can modify
From "Settings" / "Routines" / "Sprinkler system programmes" select the programmes and set the desired scheduling (start times and duration for each zone).
